- QUICK START
- CONNECTING YOUR HUD TO POSESTAND(S)
- MANAGING LIBRARIES
a. creating libraries
b. updating libraries
c. deleting libraries
d. selecting libraries - CHANGING ANIMATIONS
a. using arrow buttons
b. using your keyboard
c. using chat - RE-POSITIONING YOUR AVATAR
a. changing the posestand’s sit target
b. changing the direction your model faces - CONTROLLING LIGHTING (NEW!)
a. create a light
b. modify a light
c. save and load light sets
d. make your own lights! - USING THE BACKDROP AND PHOTO SPHERE
- USING MEMORY (YOU’LL BE GLAD YOU DID)
- FOCUS AID FOR DEPTH OF FIELD
a. using the focus aid HUD panel
b. focus plane tricks - LOCATION SHOOTING WITH THE MOBILE LIBRARY
a. put your animations into a mobile library
b. grab your camera and hit the road
c. don’t forget the lights! - CHAT COMMANDS
1. Quick Start
Getting the VR Studio running can be confusing at first, but with a few simple steps you’ll be over the hump and on your way to sexier photos!
- Rez your “VR Studio Posestand” on the ground, and wear your VR Studio HUD.
- The first time you rez your posestand, it will need permission from you to link and delink prims. Click “Yes” on the dialog pop-up to grant the permissions.
- The first time you wear your HUD you will need to follow the steps on its dialog to calibrate the HUD screen. Try to add as many lines as will fit on your screen without overflowing. If you need to recalibrate the screen later, click the “setup” button in the middle of your HUD.
- To link the HUD to the posestand you just rezzed, click the white LINK button on
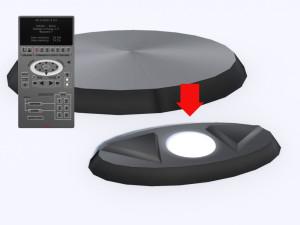 the posestand. It will automatically be assigned to the first available posestand channel on your HUD. You will receive a dialog informing you which channel the posestand was linked to. The seven channel buttons are on your HUD just below the black screen. You will notice the channel your posestand linked to is now lit up red. If a channel button’s number is dark red, that means that the channel has a posestand linked to it, but that channel is not active. Clicking the channel will activate it, and deactivate all other channels.
- Sit on the posestand.
- Click the left or right arrow buttons on the HUD or the posestand to change animations.
2. Connecting Your HUD to Your Posestand(s)
You can link up to 7 different Posestands or Mobile Libraries to the VR Studio HUD at a time, providing a quick way to work with multiple models during a shoot. The basic linking action is covered in the prior “Quick Start” section, but beyond that…
To Unlink:
Left click and hold your mouse button down on the channel number you wish to clear the link from for 1 second. You will see the channel button number turn black once the channel has been cleared.
To link to specific channel numbers:
The posestand will always link to the lowest numbered channel available, so if you want a specific posestand on a specific channel, plan accordingly!
When rezzing a posestand:
If you take a posestand back into your inventory then rez it back out again, the HUD sees it as a new posestand, so you will need to link to it again! Note that it will link to a new channel number, so you may want to clear the channel it previously occupied before linking.
If all channels are full:
The HUD will inform you if you try to link another posestand when all 7 channels are full. Follow the dialog prompts to overwrite one of the channels with the new posestand.
3. Managing Libraries
a. Creating Libraries…
Your posestand keeps your animations organized in separate libraries, which you can think of as folders. Instead of folders, though, the VR Studio’s libraries are separate prims linked to the posestand which you drag and drop your animations into.
To Create a new library, click the posestand and choose [ new library ] from the pop-up dialog. Your posestand will pop up a glowing white sphere that is your new library.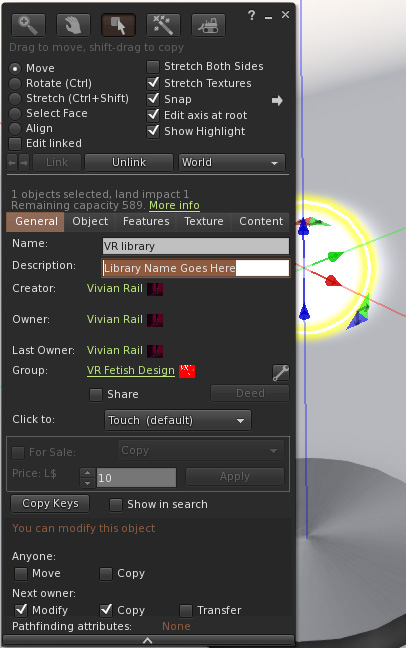
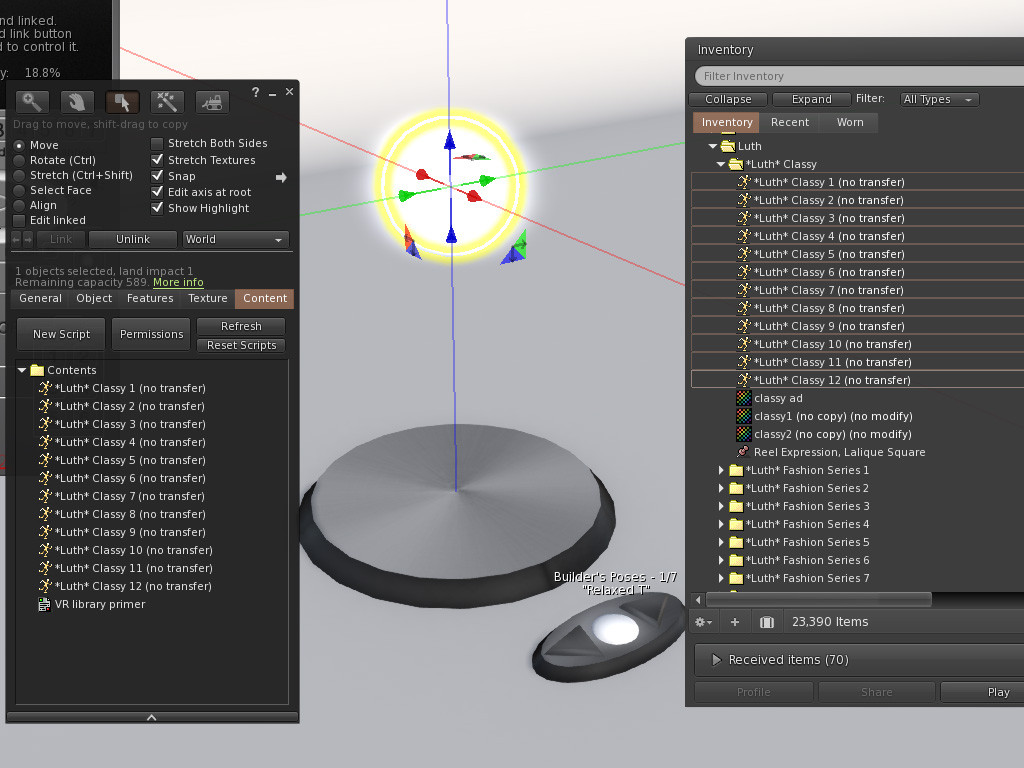
Right click the library and choose Edit. You’ll see the build panel. Change the description field from “Library Name Goes Here” to a short name that describes your new library, hit enter (to ensure your change gets saved), then click the Content tab.
Open your inventory and find the animations you would like to add to your new library. Left click and drag them onto contents section of the build dialog, or onto the library prim itself.
Once your animations are loaded into the library, close your build dialog (if you haven’t already) and then left click the library prim. Confirm that you are ready to load the library into the posestand. If there are any problems, the library will inform you before it allows you to proceed. If there aren’t any problems, you are done!
Note: Version 4.0 has been tested with 100 libraries, and it may handle many more, but be aware you are in uncharted territory after 100.
b. updating libraries
You can add or remove animations from your library at any time. Just edit the library contents and it’s good to go!
You can also rename a library by just changing its description, then left clicking it to activate it.
c. deleting libraries
To remove a library from your posestand:
Just unlink it from the posestand! If you already know how to do this, you can skip the rest of this section.
To do this, left click your posestand and choose [ show libs ] to get all your libraries out where you can get at them. Then right click your posestand and choose Edit. In the build dialog box, check the “Edit linked” box. Now, left click the library you wish to remove. You can also hold down your shift key to select multiple libraries.
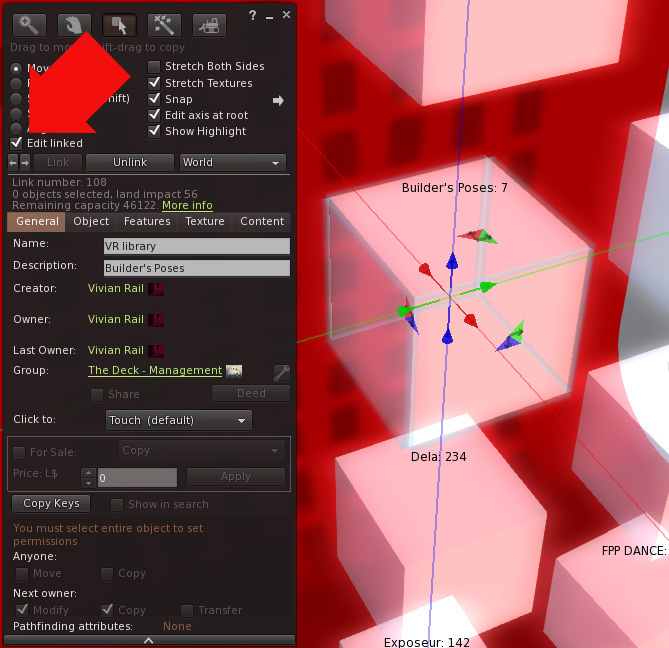
Once you have the library or libraries selected, hold down CTRL+SHIFT and then hit L to unlink them from the posestand. The posestand will automatically re-inventory its libraries when you do this.
You can either delete the unlinked libraries, or take them back into your inventory for later use.
Note: the same works in reverse. If for whatever reason you have a stray library (perhaps from another VR Studio Posestand) and you want to add it in, just link it to the posestand. Just make sure that the library you add doesn’t have any scripts in it (such as a vr library slave).
d. selecting libraries
Once you have your libraries loaded, you have a few options available when you want to change your selected library.
From the posestand:
Left click the posestand, and click [ show libs ] on the dialog menu. The posestand will pop out all your libraries. Click the library you want to use, and you’re done.
From the HUD:
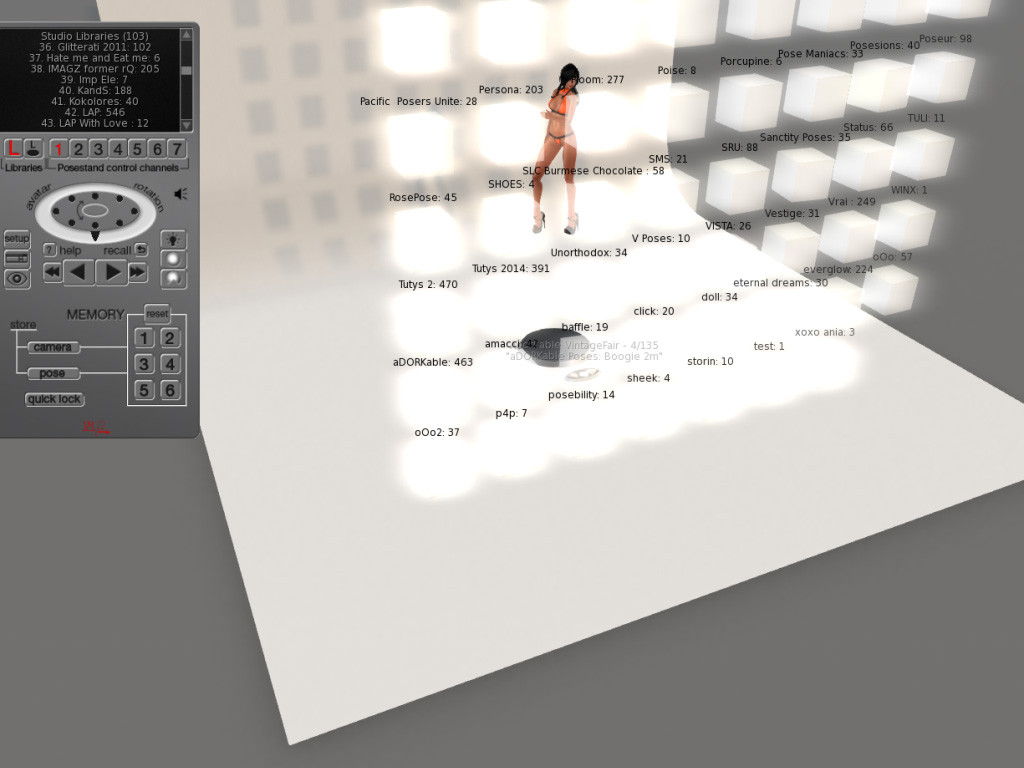
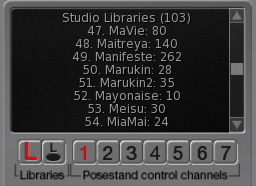 Just below the screen on the left side there are two buttons with the letter L on them. The large L will list the libraries on the screen, while the small L with the disc under it will tell the posestand to pop the libraries out in-world (or suck them back in).
With the libraries displayed on the HUD screen, just left click the library name on the screen to select that library. Use the scroll bar if needed. To return to the main screen without choosing a library, just click the L button again.
e. library options
The posestand has various options in how it displays the libraries. Click the posestand and choose [ libs config → ] to see them.
[ columns +/- ] By default the libraries are rezzed in 5 columns. If you have a lot of libraries, this may cause them to go sky high when you pop them out. Increasing the number of columns may help.
[ spacing +/- ] Change the spacing between the libraries in ¼ meter increments.
[ ball/cube ] If you wish, you can make your libraries appear as spheres instead of cubes, at the cost of higher land impact.
[ autohide ] This changes whether the libraries will automatically return to their hidden state when you select a library.
[ orbit/grid ] orbit displays the libraries in a spiral surrounding the posestand, while grid displays them in a flat grid.
4. Changing Animations
There are many ways to change animations on the VR Studio, depending on what you have on at the moment. My favorite is to use the keyboard, but everyone has their own preference.
a. using arrow buttons
 You will find arrow buttons on both the posestand and the HUD. The double arrows will jump forward or back 10 poses.
b. using the keyboard
Out of the box, the posestand will change poses when you hit shift+left or shift+right (or if you use WASD shift+A and shift+D).
If you wish for more or less keyboard controls, click the posestand you are sitting on and choose [ keybrd → ] and you will find the options to turn off keyboard control completely, or [ keybrd full ] which will make the posestand react as follows:
[←] or [→] next or previous animation
[SHIFT] + [←] or [→’] skip 10 animations
[ ↓] or [↑ ] rotate the model in 5 degree increments
[ Page Up ] or [ Page Dn ] show or hide the posestand
Using the keyboard via the HUD!
If you wish to be able to use your keyboard controls on a posestand you aren’t currently sitting on, or on a mobile library, you can click the keyboard icon on your HUD to make your HUD start listening to the keyboard. Beware, though, that with your key presses being intercepted, you will not be able to walk, jump or fly until you turn the HUD’s keyboard listener off!
c. using chat
If you say a number in chat, the posestand will jump to the corresponding animation in the current library. If you say a number that’s too high, though, the posestand will not animate you.
Note: Many posestand functions can be triggered with chat commands!
5. Repositioning Your Avatar
The VR Studio has a number of ways to make getting your model in position a little easier.
a. changing the posestand’s sit target
…in other words, changing where your avatar is in relation to the posestand.
The default sit target for the posestand is about 2 meters above the stand, which is good for using the photo sphere as your background. However, that may not be how you want to use it! If so, you will need to sit on the posestand, click it, then choose [ Position ] from the dialog menu.
Note that if you aren’t sitting on the posestand, it will not give you the [ position ] menu option.
Now you are in the posestand’s sit target adjustment mode!
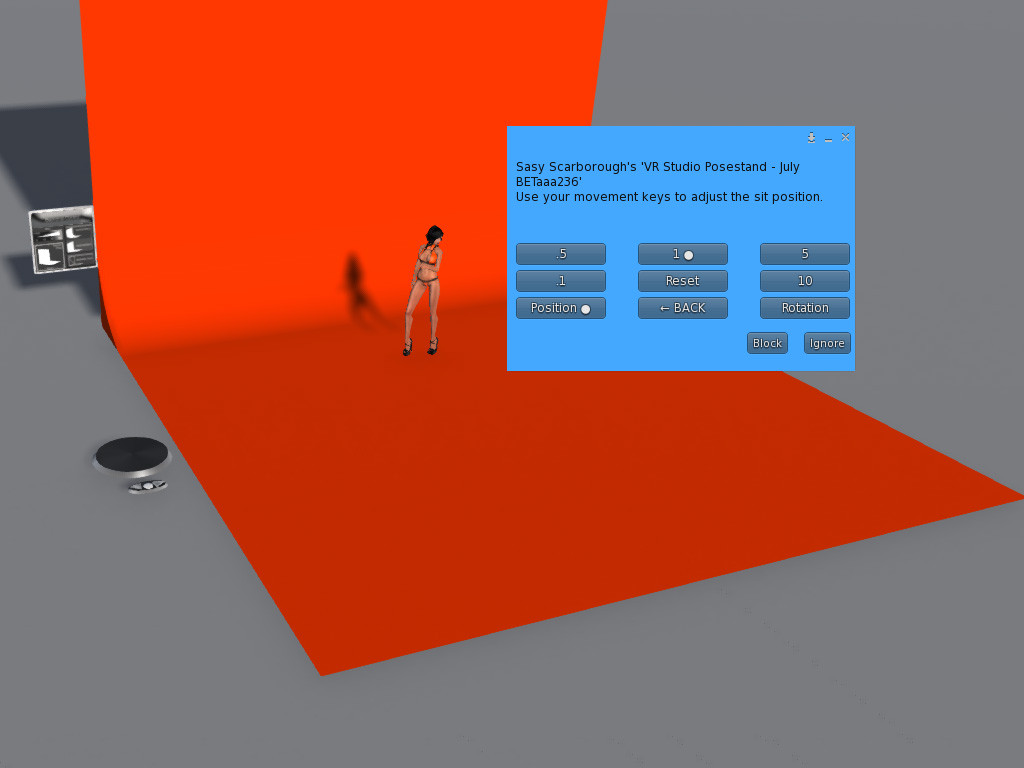 Use your [←][↓/↑][→] and [Page Up][Page Dn] keys to move your avatar around. If you need to move in smaller or larger increments, click a smaller or larger number on the dialog. You can also rotate your avatar if needed, but unless you’re trying to tilt yourself sideways or forward that’s usually best handled using the rotation ring on the HUD (which I will explain next!)
When you have your avatar positioned where you want it, click [ ← BACK ] and your posestand keyboard controls will return to their normal operation.
Important Note: Although you can use this to move yourself hundreds of meters from the posestand if you want, the posestand is only able to rez items a maximum of 10 meters away, which may cause problems with the lighting system (for now). If you are encountering problems with the photo sphere or lights not rezzing, try moving your avatar closer to the posestand.
b. changing the direction your model faces
Since it is extremely common to need to turn your model, the VR Studio HUD  has a special ring dedicated solely to that task! Just click on the ring and the model spins to face in that direction. If you want the model to face a specific cardinal direction, click one of the dots inside the ring to snap it to a 45 degree increment.
6. Controlling Lighting
The VR Studio Posestand has an assortment of projector lights pre-installed which can be individually rezzed out on demand, then controlled via the HUD.
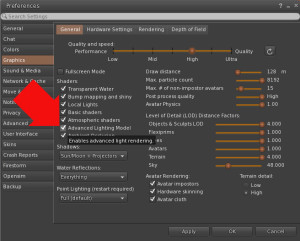 In order to see projector lights properly, you must first ensure that you have Advanced Lighting Model turned on. To do this, hit [ Ctrl ] + [ P ] on your keyboard to open preferences, click the Graphics tab, then ensure the the box is checked. You do not need to have shadows turned on to see projectors, but if your computer can handle it, even it horrific frame rates, it may be worthwhile to turn them on before you snap the photo.
The VR Studio Posestand can rez out lights by itself if you click the [ lights → ] menu option, but most of the features for controlling your lights are found on the HUD.
a. Create a light:
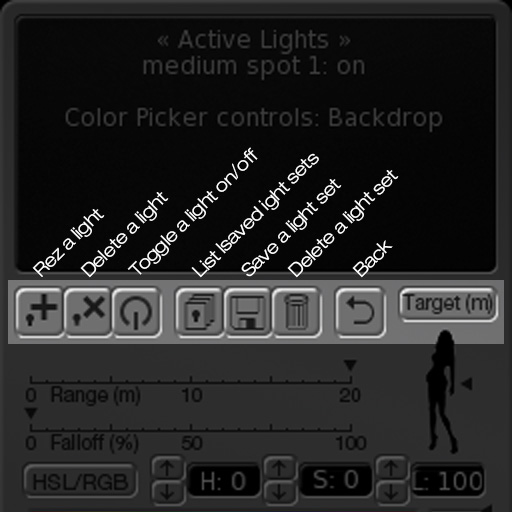
1. Click the [ + ] button to list the available lights on the HUD screen.
2. Choose from the available lights on the screen and click it to rez.
3. The light will rez directly in front of the model.
b. Modify a light:
Your active lights are listed on the HUD screen. Click the light you would like to modify.
With the light selected, the screen will display certain attributes. You can click the attributes on the screen to toggle them on and off. You can also use the Range and Falloff sliders to adjust how far the light will shine, or click on the silhouette to change where on your model the light will automatically aim at.
That said, don’t forget that although the HUD is good for a lot of things, it’s never going to be any use for getting your light positioned where it needs to be. For that, just right click > edit the light and put it where you want it to shine from. After that, the HUD can handle the rest!
Screen options:
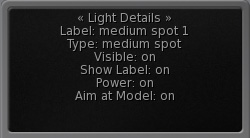 1. Label
The name of your light. This is shown in hovertext over the light. You can’t have multiple lights with the same label.
2. Type
This is the name of the texture applied to the light’s projector. Unfortunately Linden Labs hasn’t implemented a way to control this via script, so (for now) it can’t be changed.
3. Visible
You can hide the light’s model if it is in the way for your photo.
4. Show Label
You can hide the label too, if need be.
5. Power
If you want to turn a light off without deleting it, you can do it by clicking this line, or clicking on the power button below the screen.
6. Aim at Model
The VR Studio lights will automatically aim at a model sitting on the posestand by default. If you want to manually control where a light is aiming, you will want to turn this feature off before you go about re-aiming the light.  Note that if you just want to adjust it to aim a little higher or lower on your model, the better option is to use the aim height adjustment by clicking on the silhouette below the screen.
Below the screen:
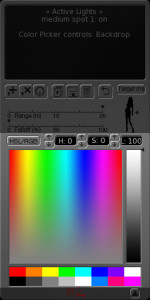 1. Color picker
The large color picker that occupies the bottom half of the HUD can be used to tint your photo sphere or backdrop normally, but with a light selected the color picker applies to the light color.
You can adjust the current color using RGB or HSL values, or if you want to key in a specific value, click the value you want to change to get a text box.
Your active color is displayed in the top right swatch of the 16 color swatches at the bottom. To overwrite one of the other swatches with the currently selected color, click and hold on the swatch until you see it save.
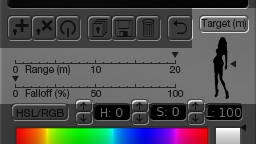 2. Range/Falloff/Aim Offset
Range:
The light can shine a maximum of 20m.
Falloff:
In the real world, the further a light shines, the less intense it is (according to the inverse square law). However, in SL that is not necessarily the case. If you set the Falloff (%) to 0, the light will shine just as brightly on a subject one meter away as it is at the maximum range. If you increase the falloff, the intensity decreases more and more according to distance. Unfortunately even at 100%, the falloff in SL never comes close to the degree of falloff in the real world, though.
Aim Offset:
The VR Studio lights will automatically aim at the center of your model seated on the posestand, however that’s not always what you want! You can click higher or lower on the silhouette to adjust where on your model the light will aim, or you can click “Target (m)” to turn off the auto aim function for a light in order to free aim it with your edit tools.
c. Save and Load Light Sets
 If you have a set of lights out and you think you may want to use it later, you can have the HUD save all the attributes of all your lights, including their position relative to your model.
Save:
Click the floppy disk button, then enter a unique name for your light set in the text box that pops up (limit 30 characters).
Load:
Click the button that looks like a stack of papers with a light bulb on top, then click one of your saved light sets on the screen. Any lights you have rezzed out will be deleted and replaced by the lights in the saved light set.
Delete:
Click the trash can button to list your saved light sets. Click on any sets you wish to delete. Click the back button to return to the main screen when you’re done cleaning.
Important Note: the number of light sets you can save is limited by script memory. If you try to save too many lights, it may cause the “vr hud light manager” script to stack-heap, in which case you will need to manually reset that script. This generally happens somewhere around 60 total lights saved in all sets combined, meaning 6 sets of 10 lights, or 20 sets of 3 lights, etc. A stack-heap collision will cause you to lose all saved light sets, so be careful!
d. Make your own lights!
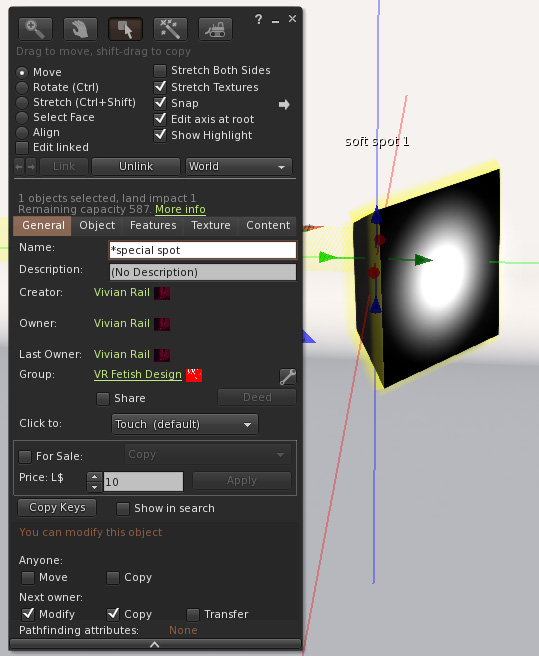
If you have a texture you want to use as a projector in your VR Studio, it’s fairly easy to load it in and do that! Just steal a light from the posestand’s inventory and rez it manually. Then give it a name (starting with a * just like all the other lights), edit the light attributes in the Features tab of the build dialog, then put it back in the posestand!
Customize it to your liking…
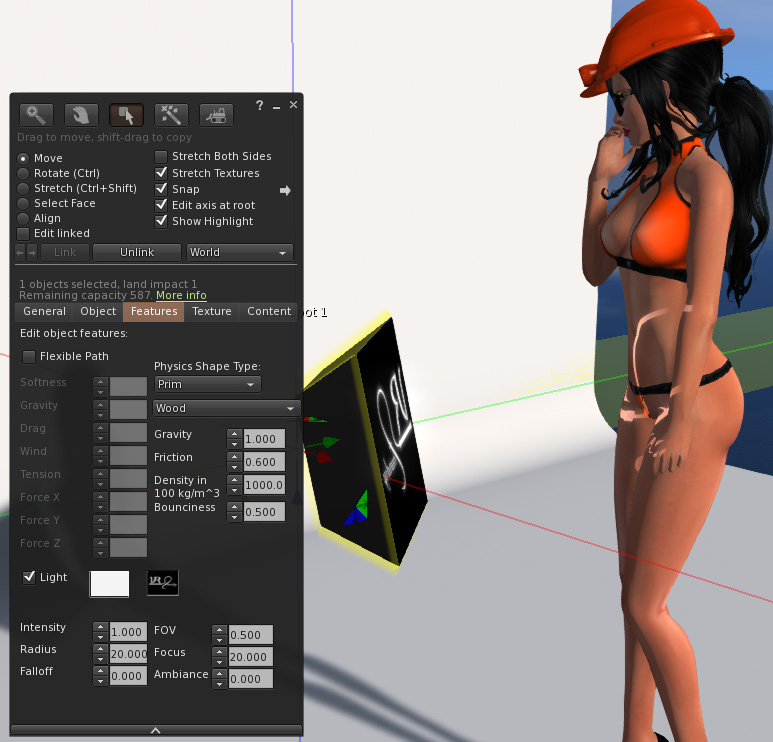
Take it into your inventory, then put it back in the posestand! You’ll see your new projector light in the list of lights next time you go to rez a new light!
7. Using the Backdrop and Photo Sphere
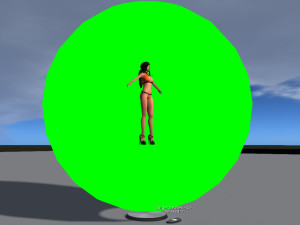 The VR Studio comes with 2 options for backdrops in your photos. The first and simplest is the photo sphere, which is a hollow sphere which surrounds your model, allowing you to shoot pictures from any angle and have a uniform color as your background – perfect for green screen or blue screen style shooting. Just type “sphere” in local chat, or click the sphere button on your VR Studio HUD to rez or delete the photo sphere.
![]() The front of the sphere can be opened up for troubleshooting or editing attachments, etc. Just type “open” in local chat, or click the open sphere button on the HUD.
The front of the sphere can be opened up for troubleshooting or editing attachments, etc. Just type “open” in local chat, or click the open sphere button on the HUD.
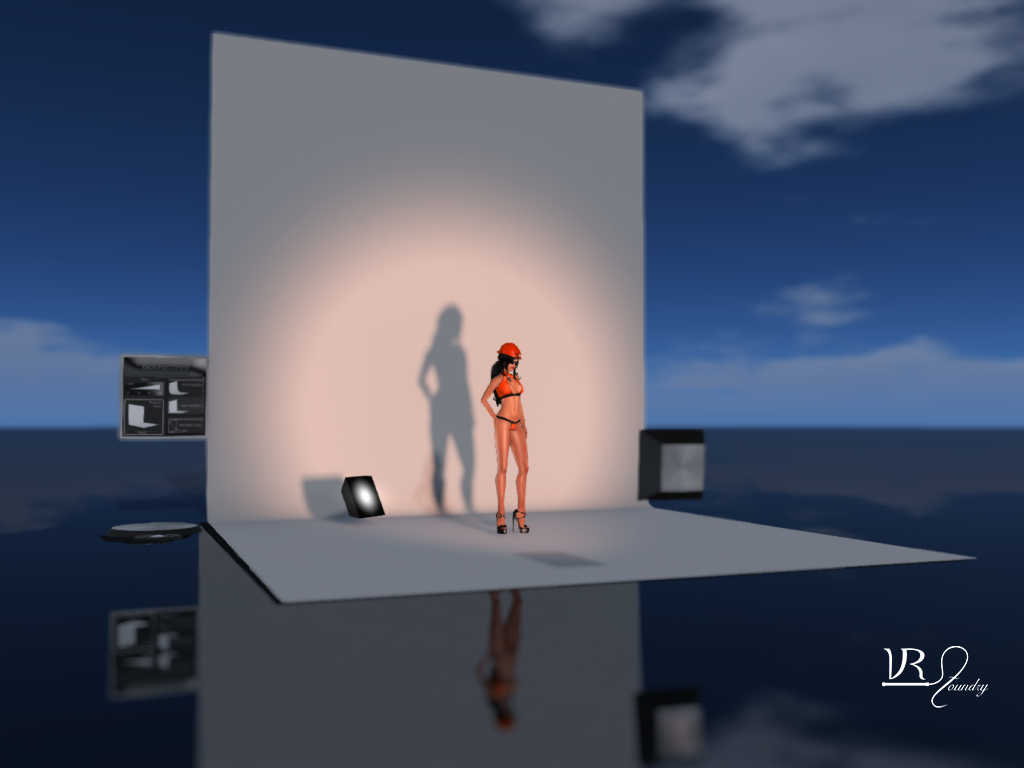
The included mesh backdrop offers you a basic studio backdrop with some powerful controls to save you time in the studio. 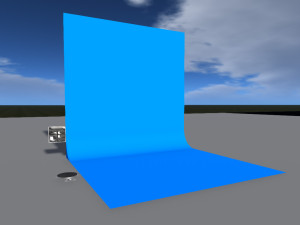 You can have the backdrop have a hard transition between the floor and wall, or 2 levels of smooth transition. The control panel lets you quickly resize the backdrop from as little as 6 meters, all the way up to 24 meters, or anywhere in between with a single click.
When active, the backdrop will listen to open chat on channel 0 for any color commands from you or from your HUD. If it doesn’t hear anything for 10 minutes, though, it will go to sleep. To wake it back up, double click and hold on the main body of the backdrop for about a second.
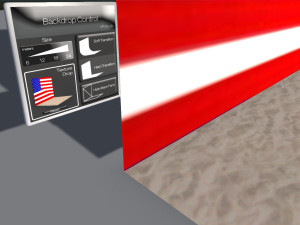 If you want to use textures on your background, you can simply drag and drop them onto the “Texture Drop” portion of the Backdrop Control panel, and it will texture your background and/or floor appropriately. To get rid of the textures, click the “Reset” button at the bottom of the Texture Drop box.
8. Using Memory
The bottom of the front portion of the HUD contains the memory functions for your animations and camera. This can save you an incredible amount of time in many situations, whether you’re a vendor shooting photos of all the colors of a new product, or just a photographer making a tricky photo that requires multiple shots with the camera in a precise position.
The basic idea is that you can save all the attributes of your current shot into a memory slot, from the position and rotation of your avatar, the position and aim of your camera (relative to your avatar, or just within the sim) and the selected library and pose.
For designers, if you want to do product posters with two shots of each of a dozen colors from two different angles, you can save each shot into your HUD, then just let the VR Studio do the work of posing your avatar and moving your camera as you cycle through the colors, leaving you more time for less menial tasks!
To save a pose or camera position:
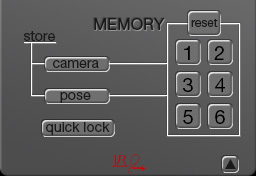 Left click the “camera” and/or “pose” buttons in the memory section. When the button lights up red, that means it will save that element. You can save just the camera position, just the pose (and associated library) or both. After you have selected which components to save, click one of the six memory slots to the right.
The memory slot will light up bright red, letting you know that channel contains data and is active. If you saved the camera position, hitting [ Esc ] will snap your camera back to that position. Click the memory slot again to deactivate it and free your camera. Inactive channels that contain saved data will have a dark red number.
To recall a saved pose/camera position:
Click the memory slot you wish to recall. When it is activated (and turns bright red), the avatar will be moved/rotated, the pose will be set and/or the camera locked into the same position. If the camera doesn’t move, try hitting your [ Esc ] key on your keyboard a few times.
To clear a memory slot:
Left click and hold on the memory slot’s button until the slot number turns black (just like the posestand channels and color swatches). If you want to clear all 6 slots and the [ quick lock ] at once, just hit the [ reset ] button in the memory section.
The [ quick lock ] button will save your camera position with a single click. It is special in that it is not linked to any posestand, so it saves the camera position relative to the sim, not your model. Once you have a quick lock saved, just click the button to toggle the camera lock on and off for that position. To clear the quick lock, click and hold the quick lock until it turns black, or hit the memory [ reset ] button.
9. Focus Aid for Depth of Field
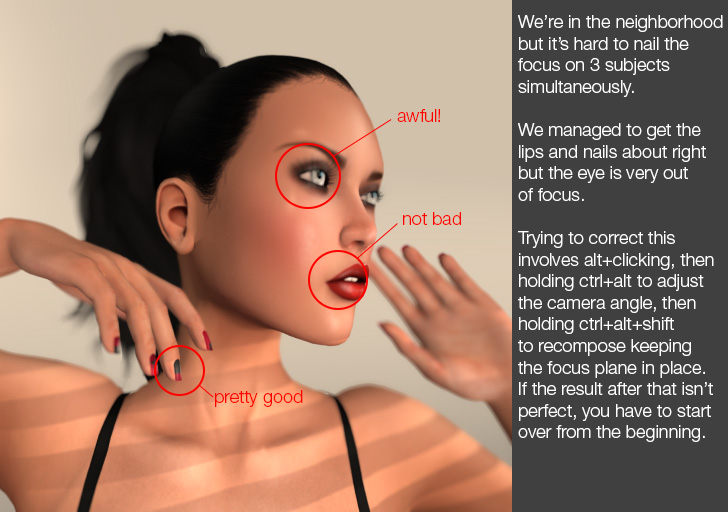
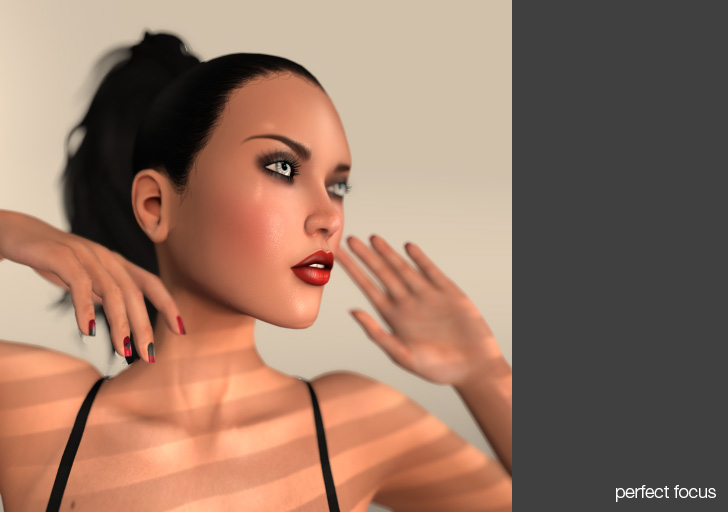
SL’s Depth of Field is a fantastic photography feature, but there are some situations where it’s a real bear to use. The Focus Aid not only mitigates those problems, it can help you get your camera position just right to put multiple subjects in perfect sharp focus.
a. using the focus aid HUD panel
In a nutshell:
- Enable Depth of Field in your graphics preferences
- Lock your camera using quick lock, etc.
- Open the FOCUS AID panel
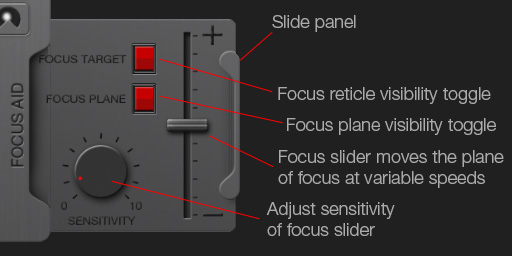
- Use the slider to fine tune your focal plane
- Close the Focus Aid panel and take your shot
The long version:
In order for the HUD scripts to control your camera, you first need to activate a camera lock. You can use the [quick lock] button, or you can save your camera into one of the 6 save slots at the bottom of the HUD as described in section 8 above. Once your camera is locked, tap your [Esc] key on your keyboard to ensure the camera is settled into the camera lock position.
If you haven’t already, open the FOCUS AID panel by clicking the tab on the side. You will see a grid and a targeting reticle indicating the exact position of your plane of sharp focus. Click and drag the focus slider on your panel up or down to shift the plane of focus closer or further until it intersects the element you wish to have in sharp focus (usually your model’s nearest eye).
b. focus plane tricks
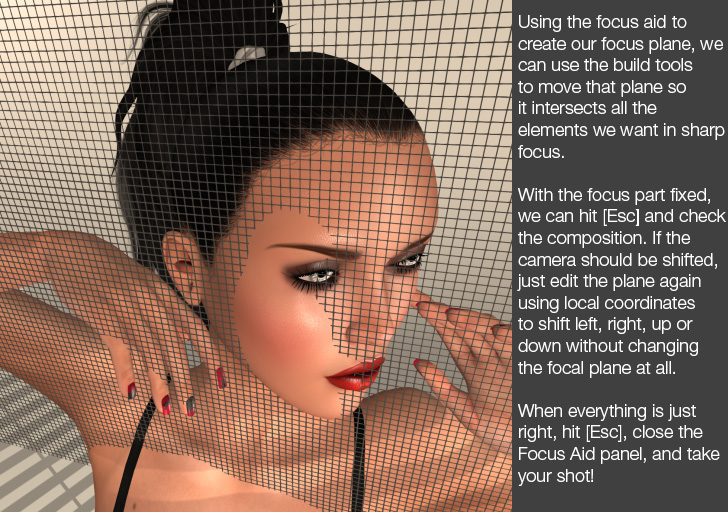
The real power of this tool is the ability to get several subjects in perfect focus simultaneously. To do this, you can alt+click around to move your camera out of its locked position, then actually right click → edit the focal plane to manually move and/or rotate it so that it intersects all the subjects you want to get in perfect sharp focus. When you have it right where you want it, hit your [Esc] key and your camera will snap into position for your new composition.
Note that when the script moves the camera after you manually move the focal plane, it will strictly maintain the camera’s original distance from the plane of focus. If you need to move your camera nearer or further, you have to use the slider to push your plane of focus further away, then manually edit the plane again to bring it back to the position you originally wanted it in.
Remember you can also use your [Ctrl] + [8], [9], or [0] keys to adjust your camera’s zoom, but this is not exactly the same as physically moving your camera closer or further.
10. Location Shooting with the Mobile Library
When you can’t drop a posestand on the ground to do your photos, your VR Mobile Library has you (and your friends) covered! You can take your studio on the road and get the shot you want without the hassle.
While your VR Studio Posestand can easily handle a hundred animation libraries, you can think of your Mobile Library as a single wearable animation library. You can put as many animations as you want into your mobile library, but just be aware that unlike the Studio Posestand, they’re all going into the same bin. If you want more bins, you can make copies of the VR Mobile Library, load them up individually, then just wear the one you want directly from your inventory.
a. put your animations into a mobile library
Start by rezzing your mobile library onto the ground, then right click it and choose Edit.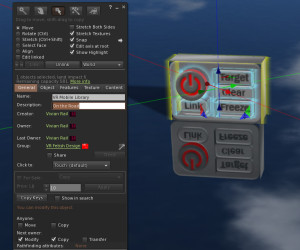 Unfortunately you can’t put the animations in while wearing it unless you have full perms on the animations.
Name the mobile library by changing the Description: field to the name you want to see appear on your HUD when linked to it. You can also change the Name: field as you like to make it easier to distinguish from other libraries in your inventory.
Once you have named it, click the Content tab of the build dialog. If you want, you can delete the preloaded builder’s poses before you open your inventory and drag your animations into the contents of the Mobile Library. Once you have dragged your animations in, wait for it to stop flashing red hovertext, then take it back into your inventory, wear your VR Studio HUD, then wear your customized VR Mobile Library it to try it out!
b. grab your camera and hit the road!
If you are already wearing your VR Studio HUD when you wear your VR Mobile Library, it will automatically link itself to the first available channel. If you forget to wear the HUD first, just click the “Link” button on the mobile library to link it up.
Once you are linked, hit the Power button ![]() so the red light comes on when you want it to start animating your avatar. Click it off to go back to your normal poses.
so the red light comes on when you want it to start animating your avatar. Click it off to go back to your normal poses.
Note: you may need to turn off your AO if it is trying to fight the mobile library’s animations.
To target a nearby avatar to animate instead of yourself, click the Target button, then click their name on the drop-down dialog.
If you want to animate additional avatars, just make more copies of the VR Mobile Library in your inventory, and then right click > add them, and arrange them on your screen using the edit tools. Each copy you wear will be linked to a different channel on your HUD.
The freeze button locks all movement controls, which can be helpful to keep you (or your models) from inadvertently wandering out of position and ruining your shot. Use it wisely! If you want to freeze yourself, you can instead use the keyboard icon on the VR Studio HUD, which will make your keyboard control the mobile library instead of moving your avatar.
c. don’t forget the lights!
The mobile library is loaded up with the same lights you have in your posestand, and they behave very similarly. If you are able to build on the land you are visiting and you need a little light, just click over to the lighting section of your VR Studio HUD and use it just like you would in the studio!
11. Chat Commands
| 0-9999 | Any positive number stated in open chat will cause the posestand to attempt to change to the pose with that index. For example, if you say “42” the posestand will change to the 42nd pose in the currently selected library, unless there are fewer than 42 poses, in which case it will inform you of the error! |
|---|---|
| hide | Hide the posestand (making it transparent and removing its hovertext). |
| show | The opposite of hide |
| sphere | Rez the photosphere backdrop |
| open | Open a 90 degree slice from the front of the photosphere |
| close | The opposite of open |
| red, blue, etc | Color names stated in open chat will cause the sphere or backdrop to turn that color. Can also be modified by dark, darker, light, or lighter, e.g. “dark red”. |
| auto | Toggle automatic cycling of poses in the current library on or off |
| auto x | Turn auto pose on with a delay of x seconds between each pose, where x is any number between 0 and 3.402823466E+38 (a very long time). |
| link | Request the posestand to establish a link with your HUD |
| new library | Creates a new library over the posestand. Will cause the posestand to unsit any seated avatars. |
| show libs | Display the libraries loaded into the stand |
| hide libs | Hide the libraries. |
| autohide | Toggle the automatic hiding of libraries after they are clicked. |
| help | Gives the link to this page. |
2 thoughts on “VR Studio Owner’s Manual”